pandoc -> markdownでアスタリスク(*)を使うと「! Undefined control sequence. l. \tightlist」というエラーになる
この記事で解決
Pandoc1.4以降でMarkdownをTexにするとエラーになる - Qiita
* hoge
のようなものをpandoc -> markdownで変換したかったら
markdown -> latex にコンバートされたものに
\def\tightlist{\itemsep1pt\parskip0pt\parsep0pt}
を入れればOK
テンプレートのtexに追加しといた。
PandocでMarkdown -> latex に変換するときにローカル環境にある画像を挿入する方法
以下のように挿入する

なぜか絶対パス( ~/test.png )では挿入できなかった
/Users/name/test.png の形に展開するとできた
~ (チルダ)をpandocが変換してくれないらしい
画像が上の位置にきてしまう
ページ上部に挿入した画像がきてしまうのでわかりにくい
ググるとpandoc のコンパイルオプションに-f markdown-implicit_figuresをつければいいらしい
pandoc -f markdown-implicit_figures --filter pandoc-citeproc --bibliography=report.bib -M linkReferences --top-level-division=chapter $mdfile -o test.tex
BioChem-Station ( バイオケムステーション 、バイオケムステ)について
ホームページはこちら
ホームページの作成方法
dillingerでmarkdown -> html にしたのを、
Online Markdown Editor - Dillinger, the Last Markdown Editor ever.
000webhostapp という無料サーバーで公開。
Free Web Hosting - Host a Website for Free with Cpanel, PHP
ドメインbiochem-station.gaはfreenomで契約した。
なぜBioChem-Station ( バイオケムステーション 、バイオケムステ)を作ろうと思ったのか
ケムステーションの生物関連の記事が少ないため。
Chem-Station (ケムステ) | 化学ポータルサイト
本当はケムステーションみたいな綺麗なポータルサイトにしたかった。 暇な時にスフィンクスなどを用いて実装してGithubで管理したい。
「cite2c」によりJupyter notebookでcitationを楽に行いbibliographyも自動で生成する
jupyterでグラフを楽に書きながら引用も楽に行いたい
インストール方法
GitHub - takluyver/cite2c: Citations in the Jupyter Notebook
を参照
python3 -m pip install cite2c
python3 -m cite2c.install
Zoteroもインストールする
Zotero | Your personal research assistant
オンラインで同期設定をすればcite2cで見れるはず。
ちなみにjupyterlabには未対応らしい
macのvimでmarkdownを書いてLaTeXを経由して「論文」の注釈・引用・bibliographyつきのpdfを生成する
できるようになること
chromeでワンクリックで論文保存→執筆時に楽に挿入、bibliographyも自動作成
(大学の授業のレポートの引用文献を書くのがだるかったためやってみた)
手順
Tex環境の整備
brew cask install mactex
vim環境の整備
Zotero(文献管理してくれるGUIツール)のインストール
Zotero | Your personal research assistant
Downloadボタンを押し、インストール。
Chrome拡張もインストールすると、押すだけで論文を保存できるので便利。
citation.vimをインストール
GitHub - rafaqz/citation.vim: Zotero and bibtex citations for Vim
vimで引用アシストしてくれるツール。
- こんな感じに論文の候補が出てきて、選択するとkeyを挿入できる。コンパイルするとkeyは引用になり、(名前、年代)文章の最後にbibliographyが挿入される。
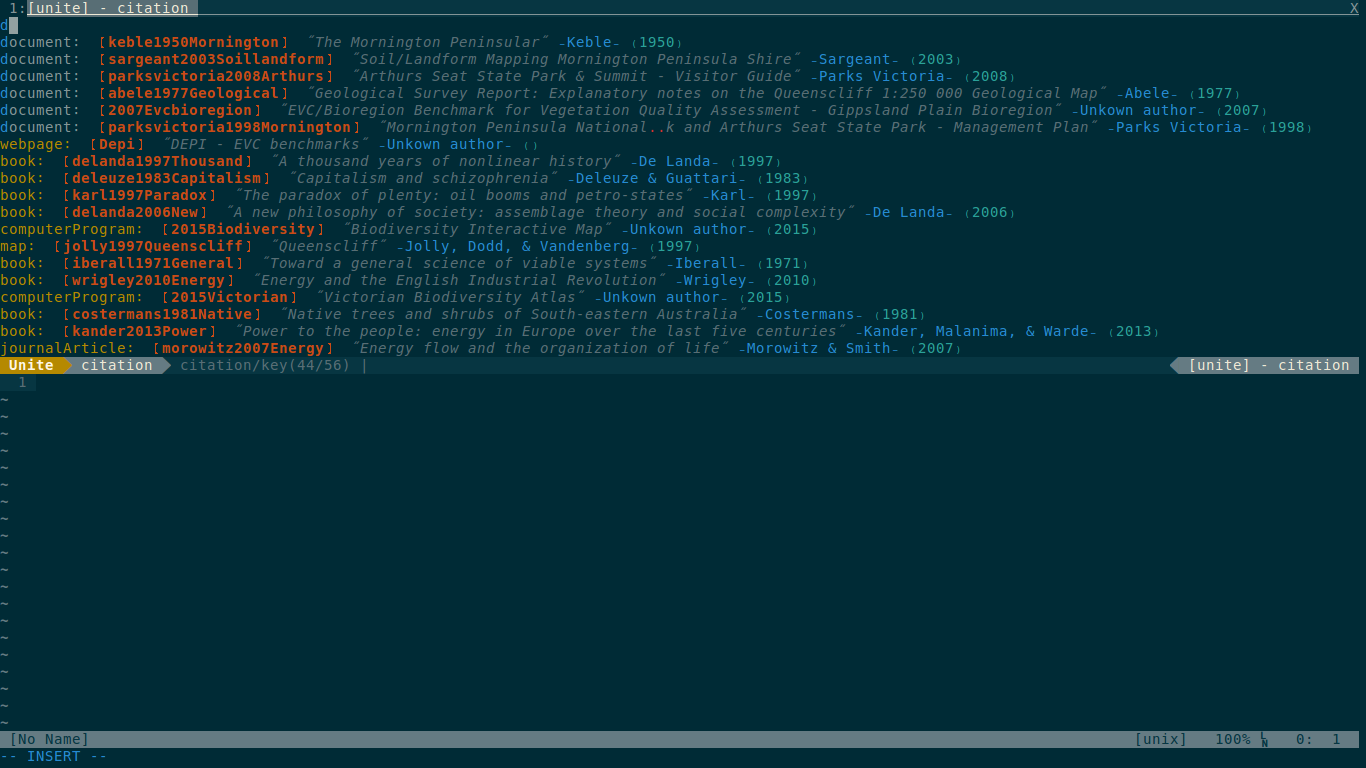
Unite.vimをインストールしていなかったので、これもインストールした。(Denite.vimには非対応らしい。)
GitHub - Shougo/unite.vim: Unite and create user interfaces
volt get rafaqz/citation.vim
volt get Shougo/unite.vim
zoteroの設定
さっきインストールしたZoteroが自動でbibファイル(citation.vimが引用するのに参照するもの)を生成するようにbetter-bibtexをインストールする。
- 以下のurlから入ってインストール。
Release v5.2.22 · retorquere/zotero-better-bibtex · GitHub
zoteroを起動し、バーの「ツール」→「アドオン」でzotero-better-bibtexを選びインストール。
その後、バーの「Zotero」→「Better Bibtex」→「automatix Export」でautomatix exportの項目を「on charge」にする。
また、その下の項目でbibファイルを保存するディレクトリを選ぶ。

これで自動でbibファイルが生成される。
作成したbibファイルをvimrcでcitation.vimに認識されるよう指定する。(ここでは~/Desktop/report.bibを指定する)(.vimrcに追記)
let g:citation_vim_bibtex_file="~/Desktop/report.bib"
また、zoteroのディレクトリ位置を指定する。(.vimrcに追記)
let g:citation_vim_cache_path='~/.cache'
 let g:citation_vim_mode="zotero"
 let g:citation_vim_zotero_path="~/Zotero"
最後にuniteのプレフィクスを指定する。これで「space」+「u」で先ほどの画像のような引用文が出てきて、選択して挿入できる。(.vimrcに追記)
 let mapleader = "\<Space>"
 nnoremap <Leader>o :CtrlP<CR>
 nnoremap <Leader>w :w<CR>
 nnoremap <leader>f :<C-u>Unite file<CR>
 nnoremap <leader>u :<C-u>Unite citation/key<CR>
あとはpdf作成を自動化できるようにlatexのテンプレートとスクリプトを書く。
- テンプレート
ほとんど
からの引用です
  \documentclass[a4paper, uplatex, dvipdfmx]{jsreport}
  \usepackage{amsmath,amssymb}
  \usepackage[includeheadfoot,top=10truemm,bottom=10truemm, right=10truemm,left=10truemm]{geometry} % 余白を指定されている場合は geometry パッケージで調整
  \usepackage{graphicx,color}
  \usepackage{hyperref} % 目次や図表番号に対してハイパーリンクを生成。hidelinks で PDF のハイパーリンクの枠を消す(参考: http://0-chromosome.hatenablog.jp/e    ntry/2015/04/10/175912 )
  \usepackage{pxjahyper} % ハイパーリンクに日本語が含まれる場合に必要
  \usepackage{longtable} % 表組みに必要
  \usepackage{booktabs} % 表組みに必要
  \usepackage{subfig} % 図の横並び表示に必要
 \usepackage[backend=biber]{biblatex}
 \addbibresource{~/Desktop/report.bib}
 \nocite{*}
\newenvironment{cslreferences}%
  {}%
 {\par}
 \title{@@@@@}  % タイトルなどはハードコーディングする必要あり
 \author{著者}
 \begin{document}
 \maketitle
\input{testt}  % ここに Pandoc で出力された LaTeX ファイルを挿入する
% \printbibliography[title=参考文献]
 \end{document}
mdfile=$1
reportname=$2
outputfilename=$3
pandoc --filter pandoc-citeproc  --bibliography=report.bib -M linkReferences  --top-level-division=chapter $mdfile -o  testt.tex
sed "s:@@@@@:$reportname:g" report.tex  > $outputfilename.tex
latexmk $outputfilename
これによって
先頭に
  ---
  bibliography: report.bib
  linkReferences: true
  ---
と書いたmarkdownを作ると、
bash makereport.sh [markdownファイル] [タイトル] [ファイル名]
で[ファイル名].pdfとしてコンパイルできる。
メモ
割と大変だった。他に楽にできる方法がないのか知りたい。
macのrstudioのrmarkdownでxelatexにより日本語対応のpdfを生成する
デフォのpdflatexは日本語非対応。
html -> pdfはできるがリンクなどが保持されない。
検索して見るとqiitaの記事がヒット
---
output:
  pdf_document:
    latex_engine: xelatex
header-includes:
  - \usepackage{bookmark}
  - \usepackage{xltxtra}
  - \usepackage{zxjatype}
  - \usepackage[ipa]{zxjafont}
---
こんな感じにヘッダーをかけばできるらしい。。。(xelatexはmactexに入っている。luatexよりコンパイルが早い。)
エラー
output file: test.knit.md

You don't have permission to change the installation in any way,
specifically, the directory /usr/local/texlive/2020/tlpkg/ is not writable.
Please run this program as administrator, or contact your local admin.
tlmgr: An error has occurred. See above messages. Exiting.
tlmgr update --self
fmtutil [ERROR]: format directory not writable: /usr/local/texlive/2020/texmf-var/web2c
You don't have permission to change the installation in any way,
specifically, the directory /usr/local/texlive/2020/tlpkg/ is not writable.
Please run this program as administrator, or contact your local admin.
tlmgr: An error has occurred. See above messages. Exiting.
同様の質問を発見。全てのパッケージをアップデートすると治るらしい
pineappleburger 25d Mea culpa... After reinstalling MacTex I forgot to update all packages, I did that just now and everything works fine now. It seems my MaxTex installation was somewhat corrupted, I guess?
Really, thanks a lot for your help and stay healthy! :heart:
アップデートして見る
brew upgrade
やっぱりVSCode使うことにした。やめる。
rstudioのrmarkdownでbibtexを用いて文献を論文風に引用する
やり方
refworks(など)でbibファイル作成
citrパッケージでbibファイルに記述された論文を引用。以下のリンクが詳しい。
と思ったがVScode使うことにしたのでRstudioはやめよう。